Just another entry to show I'm still alive. Thanks for looking in.
Showing posts with label In the kitchen. Show all posts
09 May 2016
Kind of Pretty in Pink
27 October 2014
Sunflower bouquet
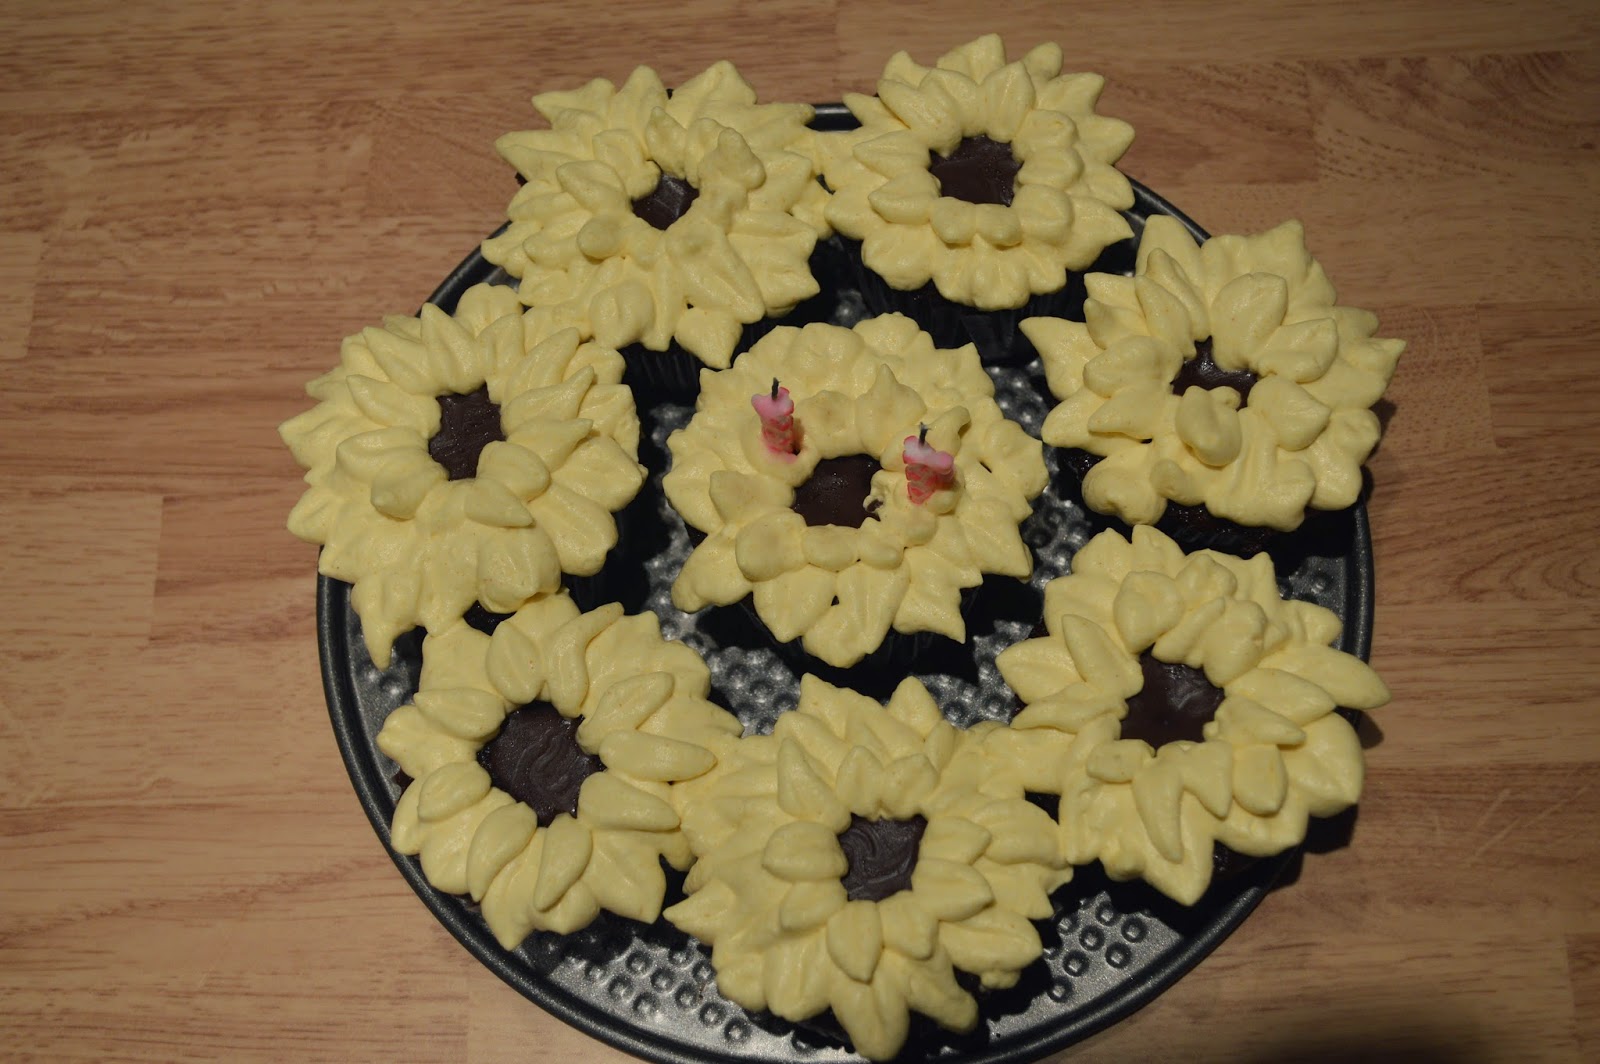
Here's a bunch of cupcakes. I made them for the 2 year old birthday we just celebrated. They are decorated with whipped cream and chocolate sauce. The chocolate hardens in the refrigerator, which makes it like a candy center. The whipped cream is tinted with turmeric. It worked well, but took quite a bit of spice, enough that I could taste it. A leaf tip made the petals. And I found a really simple chocolate cake recipe (but I cut the sugar down by about 1/2 c...and left out the espresso powder. As a non-coffee drinker, I don't understand why all chocolate needs coffee flavor.) that stayed really moist for the next few days. Now you want to eat one. So do I.
02 October 2014
Soft serve
How? Fill the ice cream cone about 2/3 full and bake as directed, with a few minutes extra. We baked them on a mini-muffin tin, but mostly just be careful not to spill as they are top-heavy.
Whip some heavy whipping cream with sweetener. Remove half into one side of a large pipping bag fitted with a large star tip. Sift cocoa powder into the half remaining in the bowl and mix briefly. I used about a teaspoon for 1/2 cup of cream. Fill the empty side of the bag with the chocolate and swirl away.
03 July 2013
Going bananas
I love them. Bananas that is. Not enough to marry them though. Just enough to feed them to myself and the Princess all the time. Thankfully her digestive system has accepted the offering fairly well.
Favorite new ways to eat them, an even old ways to eat them:
Any favorite recipes you want to share, for bananas, or for baby?
Favorite new ways to eat them, an even old ways to eat them:
- Banana/watermelon crush - Frozen or unfrozen. Yum.
- Banana 'pancakes' - little rounds sauteed in coconut oil. It helps if it's not a mush banana, but it's super yummy even as a mushy mess
- Frozen Banana yogurt - freeze bananas, blend with plain yogurt. Acts like soft serve ice cream, tastes like heaven, or how I would imagine heaven could taste.
Any favorite recipes you want to share, for bananas, or for baby?
01 July 2013
Put the yo in gurt
Are you ready?
Place milk, preferably whole, preferably as unadulterated as possible, ie not ultra-pasteurized, in crockpot. Heat to 180 F. This takes about 2-3 hours on low. Allow to cool for another 2-3 hours to 115 F. Stir in plain yogurt with live cultures, or yogurt starter, 1 cup for every gallon of milk. (Some places recommend tempering the yogurt a bit by mixing in some of the hot milk before stirring it all in.) Wrap the whole caboodle in a blanket or towel and pop it in the oven overnight or for 8-12 hours. If your home is cold, you can warm the oven a bit, or leave the light on (Welcome to Motel 6) in order to keep it warm. The goal is to cool the mixture slowly. The next morning you have breakfast. Just add fruit. Or jam. Or piles of sugar if you can't take the goodness.
Just as a warning, don't expect Greek gogurt here. It's not thick nor is it smooth, but it is really good!
02 May 2012
Hold the raisins
That aside, have you ever checked out the ingredient list on the various flakes of branny goodness? Ever notice that even the most basic version have fun chemicals like BHT and caramel coloring. Sounds delicious! Time to eat!
Unless, of course, you want to keep it natural. How? Make some of your own! Is it simple? Yes! Does it take some time? Also, yes. Is it worth it? Right now, for me, yes. I found a recipe here at 48 Homemade Breakfast Cereals > Willow Bird Baking.
She writes for a while about all kinds of cereals and has lovely pictures and when you get to the very bottom, you find this recipe (that I have taken the liberty to shorten and modify):
Bran Flakes
Recipe by: Adapted from Mr. Breakfast and now from Willow Bird Baking
Yields: about 3-4 servings (But doubling or quadrupling is a good idea,)
Ingredients:
1/2 cup bran
1/2 cup whole wheat flour
1/3 cup almond flour (or other finely ground nuts or ground flax)
Some honey (a Tablespoon is noticeably sweet, 3 T is really! sweet)
1/4 teaspoon baking soda (though I'm not convinced it lightens it at all)
1/4 teaspoon salt, if you want
1/3 cup milk
1/4 cup water
Directions:
Mix dry ingredients well. then add the wet. Cut 2 sheets to fit a baking tray or cookie sheet and place half the mixture on each sheet. Cover with plastic wrap and roll until thin and evenish.
Remove the plastic and transfer paper to the baking sheet. Heat oven to 350 F. Cook for 5-10 minutes, checking for a flexible, lightly browned leather like flake, slightly browned on the edges. It can burn quickly, so pay attention. Allow it to cool and repeat until dough is used.
Reduce the heat to 275 and break each flake into smaller flakes, like bran flake size. Spread them out on a sheet and cook for about 20 mins, stirring occasionally. Cool and eat up, because they only last for 2 weeks, according to the original site. Chances are, you won't need to worry about them lasting that long.
She gives the nutrition info as follows:
Nutritional Info: Serving size: about 1/4 of total yield Calories: 146.3, Fat: 5g, Sodium: 185mg, Carbs: 24.5g, Fiber: 6g, Sugars: 8g, Protein: 5.5g
Fun variations: Add cinnamon, vanilla, nutmeg, try different nuts, use juice in place of the milk and/or water. If your sweet tooth demands try it with chocolate chips (mix in the cereal bowl, probably not while cooking.) Also, combine with other cereals or add fruit to serve. It's tasty!
Am I extreme? Probably. Does my family like them? Yes.
03 April 2012
The wobble in the gobble
Imagine walking into the kitchen just as the most succulent looking turkey comes out of the oven. It's brown and crispy skin glistens as steam rises from the warm meat. Take a sniff. Ah, delightful! Too bad you still have to wait another 20 minutes before digging in.
That is what happened in our house this weekend. My resident-chef husband cooked a delicious bird for our April Fools dinner. No joke. He followed a recipe by Gordon Ramsey, plus or minus a few things. It was wonderful. Sorry no picture. It would only make you hungry.
Some changes he made, were to cover from the beginning with foil and bake on 350. Somehow he didn't mind that we did have bacon either. The last 30 mins, he basted and left the cover off for the rest of the time. We didn't let it rest for 2.5 hrs, nor did we follow the gravy recipe. The turkey was good enough.
That is what happened in our house this weekend. My resident-chef husband cooked a delicious bird for our April Fools dinner. No joke. He followed a recipe by Gordon Ramsey, plus or minus a few things. It was wonderful. Sorry no picture. It would only make you hungry.
Some changes he made, were to cover from the beginning with foil and bake on 350. Somehow he didn't mind that we did have bacon either. The last 30 mins, he basted and left the cover off for the rest of the time. We didn't let it rest for 2.5 hrs, nor did we follow the gravy recipe. The turkey was good enough.
19 March 2012
The actual reason for weddings
To the bride,
Congratulations once again! You have the groom, you have the date, you have the place, you have the flowers, you have picked your dress, and the other dresses, so all that remains is the cake. Yummy!
No doubt, the cake is central to the celebration, the very reason that guests attend. You get presents, everyone else settles for food. As it is such an important part of the joy and happiness of all, no need to rush a decision or feel pressure. Check these out when you have a few minutes to sit back and take it in a bit at a time.
So what are the options? Thankfully, with a peacock feather theme, there are many, including some very ugly ones, but you are the judge.
For starters, we have cupcakes, small, portable, individual servings of goodness. (But maybe minus the rhinestones.) Or, if you like individual feathers, this might be a quirky option.
Want something a little more sophisticated? Here are a few options of feathers mixed with fancy design, or other design. Or even feathers mixed with no design. But maybe you want color, all over or just a splash.
Or do you prefer a modern, artsy look? These ideas range from nice to fun to fancy, to really fancy, and all can be adjusted to match your colors and style.
If you would like to get closer to nature, cascading feathers look magnificent. Your choice to go ornate design or simply elegant and to axe the bird or keep it.
Haven’t had enough or can’t quite decide? These other options might spark your interest.
Your faithful baker, decorator, and cake taster
P.S. You may have all the outfits picked out, but have you considered hats?
Congratulations once again! You have the groom, you have the date, you have the place, you have the flowers, you have picked your dress, and the other dresses, so all that remains is the cake. Yummy!
No doubt, the cake is central to the celebration, the very reason that guests attend. You get presents, everyone else settles for food. As it is such an important part of the joy and happiness of all, no need to rush a decision or feel pressure. Check these out when you have a few minutes to sit back and take it in a bit at a time.
So what are the options? Thankfully, with a peacock feather theme, there are many, including some very ugly ones, but you are the judge.
For starters, we have cupcakes, small, portable, individual servings of goodness. (But maybe minus the rhinestones.) Or, if you like individual feathers, this might be a quirky option.
Want something a little more sophisticated? Here are a few options of feathers mixed with fancy design, or other design. Or even feathers mixed with no design. But maybe you want color, all over or just a splash.
Or do you prefer a modern, artsy look? These ideas range from nice to fun to fancy, to really fancy, and all can be adjusted to match your colors and style.
If you would like to get closer to nature, cascading feathers look magnificent. Your choice to go ornate design or simply elegant and to axe the bird or keep it.
Haven’t had enough or can’t quite decide? These other options might spark your interest.
Your faithful baker, decorator, and cake taster
P.S. You may have all the outfits picked out, but have you considered hats?
24 January 2012
Lupini: Conclusion
Success. When the husband likes it, then you know you've done well. I added a little (a little too much maybe) garlic powder one of the later soaking days to give it a little flavor. Now they are back in salty water to be snacked upon at will.
From what's available around the web, most people soak in fresh water for about 2 weeks. I found that salty water removed the bitter taste in half the time, which makes sense, as salt is used to draw out moisture, in things like salted meat or with cabbage to make coleslaw less drippy. As yet, I have no idea of the nutritional value, but it's a bean. Beans are good for you. Cost effective? Probably not. Time efficient? Nope. Exciting and new? Absolutely.
17 January 2012
Lupini: The Taste Test
"The time has come," the Walrus said... Oh, wait, no, it's day 5, so it's time for the taste test. Here's how it went down: After changing the soak water (which I decided to leave fresh today, to let some of the saltiness dissipate) and waiting for a witness to get home, I made my first attempt. I extracted one lucky bean, bit the skin, for easy removal, and popped it in. My witness will report that I had a questioning look on my face. I was trying to decide if the taste was bitter or not (i.e. not done soaking). It wasn't bitter, it had a metallic overtone, which makes me wonder if I shouldn't have soaked it in a glass canning jar with its original metal lid. Nothing like that good ol' stainless steel flavor.
Where are the beans now? Back in the glass jar, with plastic on top...and some salt. A second attempt tomorrow, maybe?
13 January 2012
Lupini: Day II
| Post soak, post rinse |
Boiling day. Boy, isn't this exciting? Only 4-14 days left until they are ready! After soaking overnight, these little beans got pretty big. Then, they were rinsed and boiled for about 90 minutes, then left in a pot until I did the dishes to clean the jar where they will soak...and soak...and soak.
That's what they are doing right now in fact. Soaking in the fridge. Soaking up some salt.
Coming soon: Taste test - only 4 days left!
If you missed the first installment, look no further than right here.
12 January 2012
Next experiment: Lupini
My favorite Italian co-worker introduced me to these a few years ago. They were slightly crunchy, salty, and yummy to snack on. The knowledgeable (and infallible) internet shows that lupini is often prepared for celebrations, such as Easter, often served with beer. Here, I am breaking tradition, with no major celebration and no beer in sight. Until a few weeks ago, I had never seen these little beans, but when they jumped off the shelf of a local market, it was time.
Lupini is a good source of protein, so the internet says, but the beans contain lots of nasty toxins too, which is why they must soak and soak and soak, until the bitterness is gone. This could be up to two weeks. My co-worked gave me a basic recipe, but, 4 years later, I have no idea where it is. I do remember a lot of boiling, rinsing, and salting. Again, after consulting the web, I decided my method:
- Soak for 24 hours. Rinse.
- Boil in salted water for 90 mins. Rinse.
- Cover in salty water (1 T/quart) and refrigerate.
- Rinse and recover with salty water 1-2 times a day until they 'don't bite back.'
- The end product was yellow and plump.
Ready for the ride?
16 December 2011
Eet smakelijk!
My husband and I like to experiment on people. Not on the person, actually, but more using people as guinea pigs. We would never actually do this to a guinea pig, and no animals were harmed, let alone in the area, during the making of this dish. It's this odd habit we have of generally making dinner we have never tried before and feeding it to guests. Granted, we experiment with food all the time when it's just us, but guests are not spared with an old standby. After that lengthy introduction, we had the missionaries over time to eat with us, and we made an excellent dish. I would do it again, and again, and again, until I started to wonder what all the cream and bacon was doing to my cardiovascular system. But that's another topic. Here is the recipe. It's good. Try it.
What did I change? I used chicken thighs, bone in, no skin. It worked fine, but make sure the juices run clear. Also, I used bacon in place of the pancetta. And I have no idea what Charlotte potatoes are. Red potatoes worked great. Tasty!
07 September 2011
The onion wrapper
My wish for a vegetable brush has increased to the point that I have actually looked for one. Amazing that someone like me would actually buy something out of normal weekly groceries. It's true; I don't like shopping.
But today, while at the local whole foods store, I checked out their selection of kitchen gadgets and, lo and behold, found various good options. Wood, plastic, colored, seemingly limitless possibilities. One nice red one was priced about $3.50. Fine, lovely, except that it was just an onion sack with an elastic around the top to keep it on your hand. Brilliant, but am I really going to pay someone to package and name my onion sack scrubber? No, I'm going to go peel my onions out of the sack and scrub. No assembly required. Sure, it may fall apart after a few uses, but by then I'll have a new sack of onions. This way, I won't have to wonder how to clean it when it turns green and smells like the socks that haven't seen the light of day for a few weeks after the gym. I can just toss it and get another. Thanks for the inspiration you packaged, elastified little scrubby!
22 August 2011
Curling and Cake
This cake gave me an opportunity to learn what not to do in many, many aspects of cake making. You can learn them too, if you like.
I started by trying various cake recipes, and I landed on this one, thanks to my sister. I did decrease the sugar by a third, 2 cups instead of 3 cups, but I like less sweetness. I tried it out as cupcakes first and it worked perfectly. When I finally baked the cake, in three 9 inch pans, as the recipe suggests, the cake hardly rose at all and barely touched the sides of the pan. Something didn't work. Undaunted, or maybe a little daunted, I tried again, this time using a little more batter in the pan. It helped, but still didn't get as much lift as I wanted. Maybe 8 inch would work better.
For the filling, I wanted something non-fruit and non-whipped cream, something new, so I decided pastry filling, like what is used in Boston Cream Pie. My friend earned her master's degree in Boston, so I found it fitting. It's a recipe in the Joy of Cooking:
- Beat together until thick and pale yellow 1/3 c sugar, 2 T flour, 2 T cornstarch, and 4 large egg yolks.
- Slowly heat 1 1/3 c milk until simmering, stirring almost constantly.
- Add about 1/3 of the milk mixture, stirring quickly to temper the eggs without cooking them. Then add it all back in the pan, and stirring constantly and scraping the sides, heat on medium low until the mixture is thick.
- Pour into a new bowl and add 3/4 t vanilla. Cover with a layer of plastic or wax paper directly on the mixture. This prevents a non-yummy film from hardening on top of the cream. Cool a bit, then refrigerate for up to 4 days.
The icing is chocolate chips melted in a double boiler, or a non-melting bowl in a pot of simmering water, with a splash of water, and some butter added at the end to make it smooth. This can stay out of the fridge and is really yummy. The red chips were treated the same way, except they were red.
As you can see, the handle is rice crispies treat. My kitchen timer made a useful form to keep the handle up for long enough that it would set.
The set up of the cake was by far the most difficult part. Little did I know that this semi-solid pastry cream would easily melt into a not very pretty mess, leaving a very flat cake behind. Next time, use whipped cream or butter cream icing to make a well for the cream to sit it. I tried this on a second attempt, though my camera had died by then, only to revive later and die again, so I have no pictures of it. It's probably the best part of the story to skip anyway.
I had already tried to dip the handle in the red chocolate, but it wasn't very smooth, so my husband and I decided to try using a blow dryer to heat it enough to smooth it out. It worked beautifully once I decided to stop being so careful and just crank the thing. I hope I didn't scare the semi deaf dog in the process.
For the cake, I dumped a bunch of the warmed chocolate (warmed in a pot of hot water, not with the blow dryer) over the cake which was on a rack, and allowed the chocolate to run all over. It's best to work quickly so the chocolate doesn't harden in the wrong spot or too early. If it does, dip a metal knife or spatula in hot water, dry it, and use the heat from the knife to smooth it out.
With some left overs, I made little curling stones, just for some extra flare. I used straws for the handles. Even they had problems with oozing filling, so the take home is make a well, or maybe just a little hole in the little ones, to keep in the filling!!!
Best part: the gasp of delight bringing it out and the pleasure on the faces of those that enjoyed it. Cake done!
20 July 2011
Close enough Tikka Masala
Not to brag, since I do it all the time, but it was amazing! I probably stared at my plate for a full minute thinking 'Did I make that?!' Who knew that I could cook something more than fairly good?! No, this was epic.
Naturally I didn't follow the recipe, because my kitchen didn't have everything it called for, but substitution makes things interesting. Before you get tired of reading, here's a warning that this post is very long and the recipe seems complicated, but it is absolutely worth any work, even if the picture doesn't look it. Ready to dive in? Here goes:
Close Enough Murgh Tikka Masala (Grilled Chicken in a Spicy Sauce) (It's Indian Food) (Serves 3-4)
Ingredients:
- 1 pound of boneless, skinless chicken
- half a chopped onion
- dash of cayenne pepper
- few mint leaves
- few Tbls of plain yogurt
- drop of sesame oil or butter
- salt
- canola oil
- dash ofgarlic
- powdered ginger
- 2 large tomatoes
- 1/2 c cilantro
- 1 T ground coriander
- ground cumin
- dried fenugreek leaves
- 1 t paprika
- garam masala
- salt
- 1 c water
- 1/2 c cream
- rice, to serve
Marinate the chicken
Cut about 1 pound of boneless, skinless chicken into 1-2 inch chunks, evenly sized.
Marinate for 6-24 hours in Marinade:
- In food processor or blender, blend to a paste half a chopped onion, a dash of cayenne pepper, a few mint leaves, some garlic, a few Tbls of plain yogurt, a dash of garam masala, and a bit of salt.
(What is Garam Masala? It's a spice used in lots, if not all, Indian dishes. It comes pre-mixed in the spice section of many grocery stores, or you can mix your own. To find spices for a good price, check whole foods stores for bulk spices. That way you don't have to pay for the fancy packaging.)
If you don't have yogurt, try sour cream. I wouldn't do it all the time, but it worked out this time.
Cook the chicken
After marinating, heat a grill, fry pan, or grill pan and cook the chicken completely. Use any extra marinade to baste, but beware that the marinade burns faster than the chicken turns brown if the pan is too hot. Oops. Transfer to a new bowl.
Finish the chicken
To the finished chicken, add 1 Tbls vegetable oil and a drop of sesame oil or butter. Sprinkle with dried fenugreek leaves, a little salt, and cumin. Keep the chicken warm.
(We're getting close to the finish, I promise.)
The Sauce:
Fried Onion paste
Thinly slice 1/2 onion. Heat enough canola oil to cover the bottom of a pan and fry the onion until browned. Put into the food processor, or blender, and add a dash of garlic, powdered ginger, and enough plain yogurt to make it smooth.
The rest of the sauce
Puree 2 large tomatoes, or about 16 oz canned tomato, with 1/2 c cilantro. Add the puree to the remaining oil in the pan from the onion paste and cook to remove the juices (5-10 minutes) stirring regularly.
Add spices (1 T ground coriander, 1 t ground cumin, 2 t dried fenugreek leaves, 1 t paprika, 1 t garam masala, 1 t salt, or to taste). Cook 1 min.
Add 1 c water and the chicken. Simmer for 5 mins. Add 1/2 c cream. Cook 5 mins more. Garnish with fresh cilantro and serve over rice. I like jasmine rice, myself.
Go forth! Try it!
(And here is the book with the original recipe, just to give credit)
11 July 2011
Calling all bakers: Cake
Why is it so easy to make something look amazing and taste mediocre? Unfortunately, I am a guilty baker myself.
Soon I get to make another. I'm excited, but my goal is that this one will actually taste good. Really good. I know I'm being demanding, but while my bakery experience taught me how to make it look good, but I want more than the watering eyeball and 'No, thank you' response. Of course, it has to look right, too.
Here's where you come in. These are my pleas to the world wide universe: 

- What is a good chocolate cake recipe for a stalked, sculpted cake?
- And I have to make a handle, preferably edible, shaped like and L that has tipped over, thus lacking much support. What will hold the shape and not fall over or get soft?
You know where the box is.

19 May 2011
Parmesan chicken
- Dinner was really yummy last night, but since I never follow a recipe exactly, I have to record my changes. But that's why I blog; it's my digital notebook. The inspirational recipe comes from Food Network's Tyler Florence and here's how I did it differently:
Parmesan Chicken
- Extra-virgin olive oil
- 1/2 medium onion, chopped
- 2 garlic cloves, minced
- 1/2 cup olives, pitted
- Basil (I used dried since my fresh plants keep dying.)
- 1 (28-ounce) can diced tomatoes
- Pinch sugar
- Salt and black pepper
- 4 skinless, boneless, chicken thighs (about 3/4 pounds)
- 1/2 cup all-purpose flour
- 1 large eggs, lightly beaten
- 1 tablespoon water
- 1/2 cup dried bread crumbs and/or cornmeal
- A bit of cheddar, grated
- Freshly grated Parmesan
- 1/2 pound spaghetti, cooked
Saute onion and garlic in hot oil. Taste the onion for doneness before adding basil, to taste, crushed olives and tomatoes. Cook on low, occasionally stirring, for a long time while you clean, shower, or complete other tasks. Once the sauce is thickened, add salt, pepper, and sugar to taste. If the tomato tastes too acidic, add 1 T of butter at a time until the flavors balance.
If the chicken is thick, pound it between layers of plastic to 1/2 inch. Set out 3 shallow bowls or rimmed plates for the flour, egg, and bread crumbs. Season the flour and crumbs with salt and pepper. Beat the water and egg until well mixed. Heat oil on the stove for frying. Coat each piece of chicken thoroughly with flour, shaking off excess (using a fork or spoon to coat and transfer between coatings makes this less messy), then dip in eggs, allowing the excess to drip off. Finally, cover in bread crumbs, again shaking excess, and fry for a few minutes on each side.
Heat oven to 450 F. Once the coating is crispy, place chicken in oven proof dish and cover with the sauce, then cheese. Bake until cheese is melty, bubbly, or crisp, however you like it, and serve over spaghetti. It was good.
Serves 3-4
What I learned:
- Check the onion to make sure it is soft before adding anything. Fragrance does not equal done.
- Add butter to reduce the acidity of the tomatoes.
- Forks make this process a lot easier for coating chicken.
- Cornmeal works in place of bread crumbs, but the aesthetics are different.
- Thigh meat doesn't dry out as easily as breast meat. I tend to over cook chicken, thus drying it out, but this was excellent.
21 April 2011
Kitchen tips
This is maybe an eclectic list, but it's stuff to remember that doesn't belong with anything else.
- Red onions are not for stewing or slow-cooking. They look like death if you try it.
- To get honey, or other sticky things, off the measuring spoon/cup, lightly grease or spray the spoon/cup before dipping in.
- Baking soda makes a great non-scratching scrub. I have used it on glass and metal to get off old stains and, with a little effort, it actually works. No idea if it would be nice to non-stick pans though. Probably not.
- To sanitize reusable sponges, wet them thoroughly and zap them in the microwave until they get too hot to touch. Then remember not to touch until it cools!
- Add butter to tomato dishes to reduce the acidity.
- Tomatoes splatter! Add to pots or pans carefully!
- When planning a dinner for guests, make something that you are very comfortable making. Making that new dish you always wanted to try could turn out as a wreck.
- Also, with guests, make food that will be okay, even if they come a little late. Stir-fry and creamy pastas sitting on the stove for an extra 10 minutes, for example, don't look good squishy.
19 April 2011
Sprouts
In the Fresh Food from Small Spaces book, he suggests that a person can grow 10% of their own food even from small container gardens. That's a lot, and we're still working on that, but one way he recommends to increase that number higher is by sprouting seeds and beans. From the all-knowing internet, sprouting seeds increases the nutrient value, which varies from seed to seed. Sprouting also increases digestibility, making the little tummy happy. So, I decided to try it.
So far, I have tried lentils and mung beans. Both worked well and were tasty, though the aesthetics of mung beans is a little better since these are the bean sprouts most grocery stores sell. I want to try broccoli, alfalfa, and other ones I pick up on the way. Part of the struggle is where to find seeds. Not all garden seeds are equal to sprouting seeds. There are online stores like The Sprout People, but I haven't extended myself quite that far yet.
Most sprouters, okay, the 3ish people I read about, say to wash and check over the seeds or beans to remove any that don't look tasty. Then add enough water to the jar or container to cover all the seeds. (My container currently is a glass pasta sauce jar). Let them soak for about 8 hours and rise. Cover the container with thin cloth, secure with an elastic or something similar. Rise them 2-3 times a day and drain as much water as possible after rinsing. Store them out of light, because they will start turning green and get tough, though some people leave them in light the last few hours before use because green is a pretty color on the plate. Sampling a few each rinse can help to gauge doneness.
The next hurtle is to figure out how to use them. We've tried curried lentils and tried both lentils and bean sprouts with stir fried veggies. They also work in salads, but not all sprouts are good raw. Others don't work for cooking. Still trying to figure that one out.
Do you have any good recipes? The floor is open to any suggestions and ideas.
Subscribe to:
Posts (Atom)